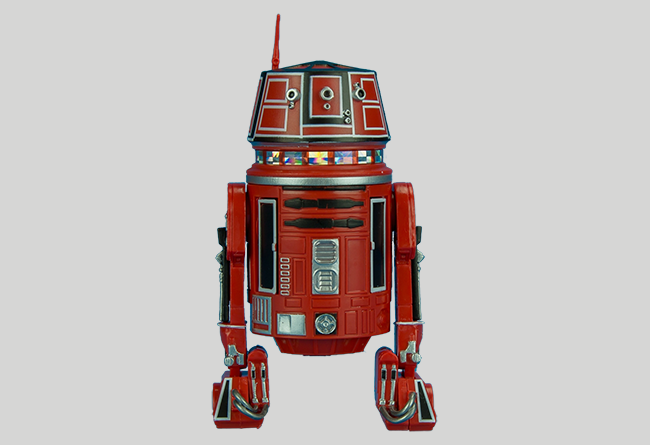
Name: R5-K6
Type: Industrial Automaton R5 Astromech Droid
Degree: 2nd Degree
Class: Astromech droid
Sensor Color: Blue
Plating Color: Red and a black
Gender: Masculine Personality
Personality Module: Elementary
DEXTERITY 1D
KNOWLEDGE 1D
MECHANICAL 1D
Astrogation: 4D
Starfighter Piloting: 3D
Space Transports: 3D
PERCEPTION 1D
STRENGTH 1D
TECHNICAL 2D
Computer programming/Repair 4D
Space Transports Repair 4D
Equipped With:
• Three wheeled legs (one retractable)
• Retractable heavy grasper arm (+1D to lifting, maximum 2D)
• Retractable fine worker arm
• Small circular saw (4D damage, 0.3 meter range)
• Acoustic signaler
• Holographic projector/recorder
• Fire extinguisher
Move: 5
Size: 1 meter tall
Cost: 2,000 credits
Background: R5-K6 was an R5 unit astromech droid manufactured by Industrial Automaton that served the Alliance to Restore the Republic during the Galactic Civil War against the Galactic Empire. R5-K6 had red and black paneling and black sensors. The droid was part of the Massassi Group based out of the Great Temple, the Alliance’s headquarters on the moon Yavin 4. It flew with the pilot Garven Dreis, who flew in his T-65B X-wing starfighter as Red Leader of the Rebel Alliance Starfighter Corps’ Red Squadron.
In 0 BBY, the Rebel forces at Yavin were scrambled when it was discovered that a Rebel strike team had disobeyed orders and infiltrated the Imperial security complex on the planet Scarif to steal the plans for the Empire’s Death Star superweapon. Red Squadron, including Dreis and R5-K6, were amongst the forces that accompanied Admiral Raddus to the Scarif system to try to support the strike team.
Upon arriving in the star system, the Rebels immediately engaged the Imperial forces above the planet. R5-K6 and the rest of Red Squadron fought alongside Gold Squadron in engaging the Imperial starships in space while Blue Squadron attempted to enter the planet’s atmosphere to provide air support. Despite taking heavy losses, the Rebels were ultimately victorious and successfully stole the plans before the surviving forces, including Dreis and R5-K6, retreated.
Shortly after the Battle of Scarif, the Empire learned the location of the Rebel’s base on Yavin 4 and sent the Death Star to the Yavin system to destroy it. General Jan Dodonna briefed rebel pilots in the temple covering the Death Star’s vulnerable thermal exhaust port in preparation for the battle. R5-K6 attended the meeting, standing beside the Wookiee Chewbacca. Armed with the knowledge of the Death Star’s weakness, R5-K6 and Dreis once again launched as part of Red Squadron alongside Gold Squadron to try and destroy the superweapon looming above the moon before it could destroy the moon itself. Dreis and the rest of the Red Squadron initially attempted to draw fire from the Imperial TIE/LN space superiority starfighters and turret emplacement so that the BTL-A4 Y-wing assault starfighter/bombers of Gold Squadron could attempt to hit the Death Star’s vulnerable thermal exhaust port.
After most of Gold Squadron was destroyed, Dreis and R5-K6 attacked the port with two wingmen. Both other pilots were killed in the attempt, and although Dreis made the shot, it only impacted the surface of the Death Star rather than entering the port. Dreis and R5-K6 were then also killed when the Sith Lord Darth Vader shot down their craft himself, causing it to crash into the surface of the Death Star and explode. Ultimately, Red Squadron was able to destroy the Death Star and win the battle.
Appearances: Rogue One, Episode IV A New Hope