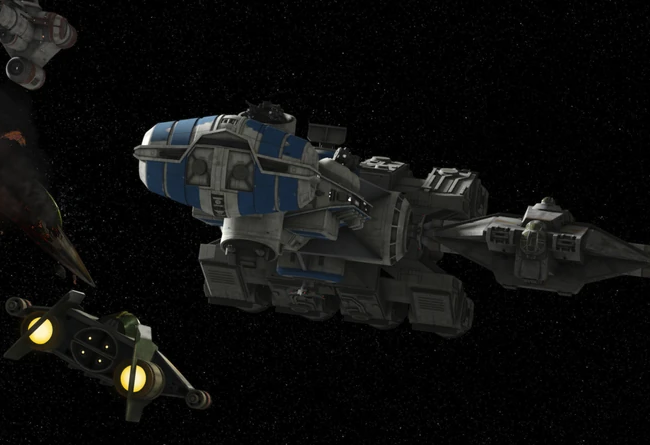
Name: Liberator
Craft: Corellian Engineering Corporation CR90 Corvette
Type: Mid-sized multi-purpose vessel
Scale: Capital
Length: 150 meters
Skill: Capital ship piloting: Corellian Corvette
Crew: 30 to 165, depending upon configuration
Crew Skill: Astrogation 3D, capital ship gunnery 4D+1, capital ship piloting 3D+2, capital ship shields 3D, sensors 3D+1
Passengers: Up to 600, depending upon configuration
Cargo Capacity: 3,000 metric tons
Consumables: 1 year
Cost: 3.5 million (new), 1.5 million (used)
Hyperdrive Multiplier: x2
Nav Computer: Yes
Maneuverability: 2D
Space: 6
Atmosphere: 330; 950 kmh
Hull: 4D
Shields: 2D
Sensors:
Passive: 40/1D
Scan: 80/2D
Search: 100/3D
Focus: 5/4D
Weapons:
Quad laser cannon turret
Scale: Star Fighter
Fire Arc: Turret
Crew: 1
Fire Control: 2D+2
Space: 1-5/15/30
Atmosphere Range: 100-500/1.5/3km
Damage: 6D
Dual Turbolaser Turret
Scale: Capital
Fire Arc: Turret
Crew: 3
Skill: Capital ship gunnery
Fire Control: 4D
Space Range: 3-15/35/75
Atmosphere Range: 6-30/72/150 km
Damage: 5D
6 Double Turbolaser Cannons
Scale: Capital
Fire Arc: 3 front, 1 left, 1 right, 1 back
Crew: 1 (3), 3 (3)
Skill: Capital ship gunnery
Fire Control: 3D
Space Range: 3-15/35/75
Atmosphere Range: 6-30/70/150 km
Damage: 4D+2
Background: The Liberator was a CR90 corvette that was part of the Phoenix Cell. She and two other CR90s participated in the rescue of Kanan Jarrus over Mustafar, destroying multiple TIE fighters and saving the otherwise trapped Spectres. After an attack on the Phoenix fleet by Darth Vader, who destroyed the command ship Phoenix Home, Phoenix Commander Jun Sato transferred his command to the Liberator. To distinguish her from the other corvettes in the fleet, the Liberator was given a blue paint job that almost entirely covered her hull. At some point during the conflict, the Liberator was transporting Commander Sato and Ezra Bridger when it was suddenly pulled out of hyperspace by an Imperial Interdictor, an Imperial warship equipped with gravity well projectors. The Liberator had been investigating the disappearance of a rebel patrol in the Del Zennis system.
Following the capture of the Liberator and her crew, Phoenix Leader Hera Syndulla sent Kanan Jarrus, Captain Rex, and Chopper to rescue the ship’s crew and Ezra. The rebels succeeded in rescuing Ezra along with Commander Sato and his crew. After picking up Kanan and Rex in an escape pod, the Liberator attempted to jump out of the system but was once again torn back out of it by the gravity wells. However, Chopper had previously sabotaged the Imperial Interdictor’s gravity well projectors to affect all nearby ships and it also drew in the Arquitens-class command cruisers protecting the Interdictor. The collision of the Interdictor and the light cruisers disrupted the gravity field seconds before the corvette impacted as well and the Liberator veered off as the Interdictor imploded, to her crew’s jubilation. The Liberator and her passengers then escaped into hyperspace where they rejoined the Phoenix fleet.
The Liberator and the rest of the Phoenix rebels, devoid of a permanent base, hid within the spaceports of Garel, an Outer Rim planet near Lothal. After the Empire discovered the rebel presence on Garel, the Liberator and the rest of the Phoenix fleet braved the Imperial blockade to escape into space, though one of her Taylander shuttle escorts was lost to enemy fire. While attempting to escape Garel, the Liberator was caught in the tractor beam of the Imperial Star Destroyer Relentless. However, Hera managed to free the Liberator by ramming the Ghost into the Star Destroyer’s tractor beam projector; allowing Commander Sato and his crew along with Rex to escape into hyperspace.
The Liberator’s conference room later hosted a meeting between Commander Sato, Rex, and the crew of the Ghost to discuss their options for opening a new hyperspace route into the Lothal sector. During the meeting, the rebels decided to send a diplomatic mission to seek permission from the Mandalorian Protectors, a Mandalorian faction, to allow them safe passage through the Concord Dawn system. This mission was headed by Phoenix Leader Hera. However, Hera’s mission was attacked above Concord Dawn by Protectors, whose leader Fenn Rau had sided with the Empire. Following the failed mission, Hera was treated by a 2-1B surgical droid in the Liberator’s medical bay.
The Liberator’s conference room hosted a debriefing attended by the rebels with the exception of Hera. During that meeting, the rebels decided to send a sabotage mission headed by Kanan to destroy the Protectors’ Fang fighters, which were housed in a base on the third moon of Concord Dawn. This mission succeeded in destroying the Protectors’ starfighters there and capturing Rau, who agreed to allow the rebels safe passage through the Concord Dawn system in return for keeping his capture a secret from the Empire.
Not long after the Concord Dawn incident, the Phoenix fleet stole a Quasar Fire-class cruiser-carrier from Ryloth which became the new Phoenix Home, though the Liberator continued to faithfully serve the fleet. It, along with the carrier and the trio of Hammerhead corvettes, participated in a short battle with Admiral Kassius Konstantine’s fleet in space but successfully escaped to the isolated planet Atollon after Chopper provided coordinates.
Not long after the establishment of Chopper Base, the Liberator transported Ezra Bridger and Kanan Jarrus in a mission to rendezvous with another rebel transport, the Sphyrna-class Hammerhead corvette P3. Upon exiting hyperspace, however, they found that P3 had been attacked and heavily damaged. The Liberator came alongside the damaged Hammerhead and docked with her, allowing Ezra and Kanan to explore the ship and find out what happened. They learned from an injured rebel crewman that a “red blade” had attacked them and that the Ghost was in danger. Returning to the Liberator, the two Jedi contacted the Ghost but discovered to their horror that the former Sith Lord Maul had already captured them, threatening to kill them unless he was given the Sith holocron Ezra had taken from Malachor. After a tense exchange, Ezra and Kanan agreed to his demands and the Liberator shuttled them back to Atollon to recover it.
The Liberator later took part in a skirmish above the planet Mykapo. After the Ghost crew returned to the system to help rescue Mart Mattin and his Iron Squadron, Commander Sato arrived late to the battle with the Liberator and a pair of A-wings. The CR-90 easily destroyed the opposing forces, destroying a Gozanti cruiser and inflicting damage to Konstantine’s light cruiser. After the skirmish, the Liberator came face to face with Grand Admiral Thrawn but quickly made her escape into hyperspace.
Appearances: Rebels